Tips
How to use, manage, and fix issues of the S Pen’s Air command

Samsung‘s Air Command is the heart and soul of the S Pen – it’s what makes it so easy and fun. This menu and its Floating icon let you access your S Pen features quickly, and you can add or remove shortcuts from the Air command to make it more convenient for you.
Air command gives you access to signature S Pen features. You can access the Air command anytime you are using your phone by simply taking out the S Pen.
Alternatively, the Air command can be activated by simply hovering the S Pen over the screen and then clicking the S Pen button.
Once opened, you’ll see a menu that features several options, including Smart select, Screen write, and Samsung Notes. You can also create a Live Message, sending your friends and family a drawing that comes to life before their eyes. Or, if you’re reading something in a different language, it’s simple to select text using the S Pen and have it translated with the Translate feature.
Similarly, there are several possible reasons why the Air Command shortcut menu may not display. It can be the result of a physical issue, like damage to your S Pen, or an issue with your phone’s software.
You can reboot the phone, perform a software update, or boot in safe mode to solve the problem. Here are a few things you can do to determine that the problem has been solved.
Read More: How to enable 96Hz refresh rate on your Galaxy Note 20 Ultra
Understand how to use and manage the Air command menu on your Galaxy Note
If you’re surfing through any website on your phone and see something you want to buy, don’t wait. You can take up a screenshot quick with Smart select on your S Pen.
It’s just one of the features you can use with the Air command on the Galaxy Note series. You can also edit and adjust what apps or features show in the Air command menu for faster access.
Air command features
Draw a heart around that cute picture or translate a foreign language, just two cool things you can do with Air command.
To see all of the Air command’s features, hover the S Pen over the screen, and tap the floating Air command icon.
You can access the following features in the Air command menu:
- Create note: Open Samsung Notes to jot down a quick note with the S Pen.
- Smart select: Allows you to collect content quickly. You can also make your own GIFs from content on the screen.
- Screen write: Write and draw on the current screen.
- Live message: Draw your own emojis, make animated GIFs, or write handwritten messages on photos. Live message allows you to express your feelings and send them to people you care about.
- Translate: Hover the S Pen over a word to translate it.
- Note: Currencies and units in a sentence can be converted in accordance with the system language that you’re currently using.
- Bixby Vision: Identify landmarks, translate foreign languages, and shop for products online. The option will vary depending on the image.
- PENUP: Let your creativity run wild. Draw, color, and much more.
- Setting icon: Change the Air command settings.
- Add shortcuts: Add shortcuts for your frequently used apps to the Air command panel.
Add or remove app shortcuts
You love the default Air command shortcuts, but there are other apps you’re always using as well. Add all your favorite apps to Air command shortcuts for quick and easy access.
- Open the Air command menu using your S Pen.
- Scroll to the bottom of the Air command features.
- Then tap Add shortcuts.
- Select the app you would like to add to your Air command menu.
Note: The number of apps you can add to the Air Command menu may vary by device.
Turn the Air command icon on or off
Maybe you keep accidentally touching the Air command icon by mistake. No worries, you can make it disappear if you prefer.
- With the Air command open, tap Settings, and scroll to the Air command section.
- Then tap the switch next to the Show floating icon.
If you need to access the Air command features, just take the S Pen out of your phone. The Air command menu will automatically open.
Air Command is not working on Samsung Galaxy Note phone or tablet
Fix 1
Check for S Pen Damage
- If the button on the S Pen is pushed below the surface, then the S Pen is damaged and must be replaced.
- If there is no physical damage, proceed to the next step.
Issues with Air Command on Samsung Notebook
If you are having issues using or launching Air Command on your Samsung Notebook, it most likely means your PC is missing a program required to run it. It’s also possible that there is a program installed that is preventing Samsung’s software service from running.
Install the Air Command app.
- Open the Microsoft Store on your PC, and then search for Air Command. Click Get to install it.
Install Pen Service & Driver.
- After you’ve installed Air Command, click the Start menu on the taskbar.
- Then find and open Samsung Update.
- Click the Samsung Apps in the left menu, and then find and click Pen Service & Driver. Click Download.
Uninstall any programs that interfere with Samsung’s software service.
- If Air Command still isn’t working, uninstall any programs that may be interfering. For example, Go clean and Classic Shell are programs that force Samsung’s software service to stop running.


Icons are the most crucial part of the user interface. Everywhere we interact with system functions and applications, icons play a key role over the text guide. Samsung One UI already features neat and clean app icons across the user interface, but, you can also try out iOS-styled icons on your Galaxy device.
Follow our socials → Google News, Telegram, Twitter, Facebook
The One UI software doesn’t have the ability to alter the design or shape of the app and function icons. It becomes a disappointing thing for Galaxy consumers, but we have a cool way so you can turn app icons from a big hidden directory to choose from.
How to activate hidden customizer
First, open the Good Lock app, followed by the Theme Park application (if you don’t have these apps already, download them from Galaxy Store). Do note that the installation of Good Lock is necessary to get access to Theme Park, so don’t waste time bypassing steps.
Theme Park is the only way to alter icon design on Samsung Galaxy devices. One UI doesn’t allow you to easily change the shape, style, or layout of app icons, but Good Lock makes it possible. Theme Park could bring you what you want, but, it doesn’t work perfectly on all apps.
![]()
How to apply iOS-shaped icons
To apply iOS-shaped icons on the One UI interface, open the Theme Park application from Apps Screen. Navigate to the Icon tab through the bottom bar and hit that interactive “+ Create New” button.
Apart from the ability to download Iconpack through Galaxy Themes, the interface allows you to create your own iconpack using Shape, Icon Color, Tray color, and Size functions.
The pre-selected shape is the original One UI icon shape, while the second is circular, which looks a lot similar to Google’s stock Android experience. For iOS-shaped icons, you have to select the “fourth” option, and voila!
The large icons preview interface will display nine app icons so you can customize further before applying finally. After customizing the Icon color, Tray color, and Size, you have to hit the “↓” Download icon and give a name.
Put the name as per your preference and tap OK. After short processing, you will be redirected to the page from where you began the customization journey where you should see your own created Iconpack.
Now, tap on the icon pack you just created to apply to your phone’s by-default settings. Finally, hit the “Apply” toggle and let the Theme Park do magic and turn the shape of the original One UI icons to iOS-inspired.
Enjoy!
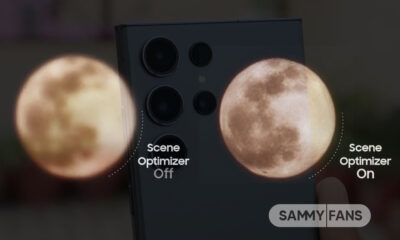
Samsung offers several features to let Galaxy customers manage and customize their phone’s camera. Meanwhile, Good Lock’s Camera assistant has some advanced features that provide more ways to manage camera settings as per your preferences.
It brings some useful features that you can drive to make your already strong Samsung camera stronger. It automatically switches the camera lens based on your surrounding so that you get the best of the present moment.
Follow our socials → Google News, Telegram, Twitter, Facebook
It also lets you prioritize between the picture quality and picturing speed, video recording in photo mode, shoot continuously at regular shooting intervals, and much more.
For photoholics, the Samsung Camera Assistant will be the best choice as it lets them capture their best shots with their phone itself. Here are some tips and tricks that will make it easy to use the Samsung Camera Assistant module:
How to use Samsung Camera Assistant:
All you need to have is a compatible Galaxy smartphone and Good Lock app installed in it. Now open the “Good Lock” app, visit its “Life up” page, and tap the download button beside “Camera Assistant.” The following options will appear:
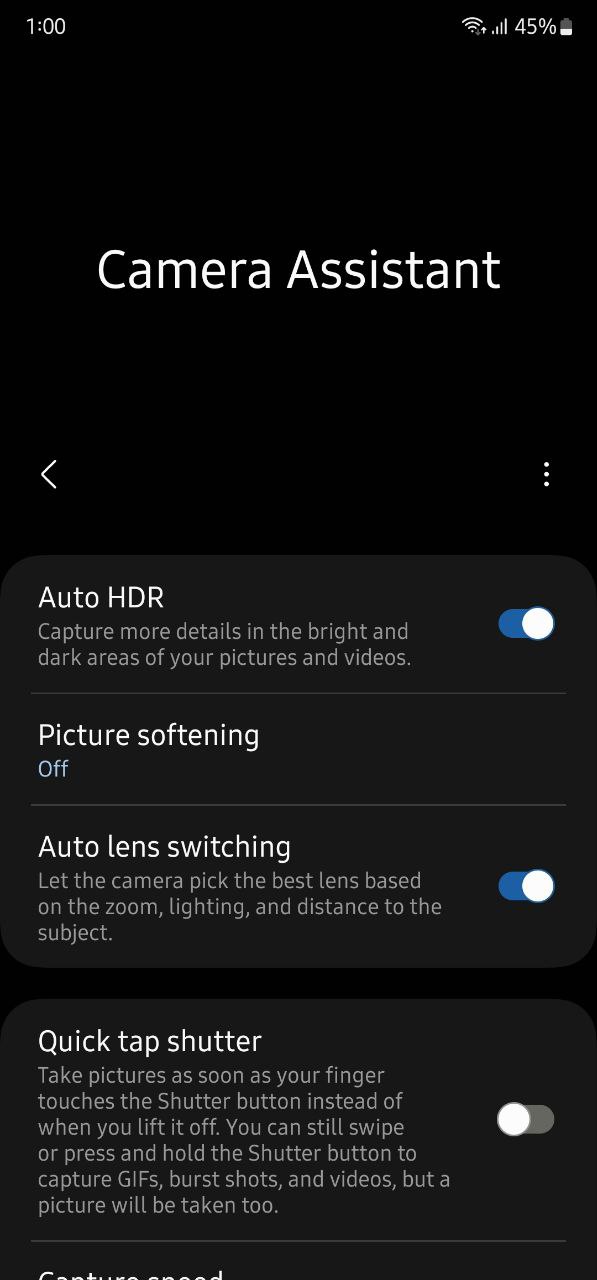
Auto HDR:
It is a feature that lets you capture more details in your pictures and videos in a bright and dark environment. To use it, all you need to do is just turn the toggle on.
Picture softening:
The picturing softening tools are available for customers who prefer a soft picture texture rather than the Galaxy camera’s default picture quality, which offers you pictures with detailed and sharp textures.
There are two softening tones to choose from – Medium and High. You can choose the one according to your preferences and if you are not a person who likes soft images, can simply turn it off.

Auto lens switching:
Once you turn the toggle of this feature on, your Galaxy phone will automatically pick the best lens based on zoom, lighting, and distance to the subject. This way, you can capture the best shots, no matter the time, place, or environment.
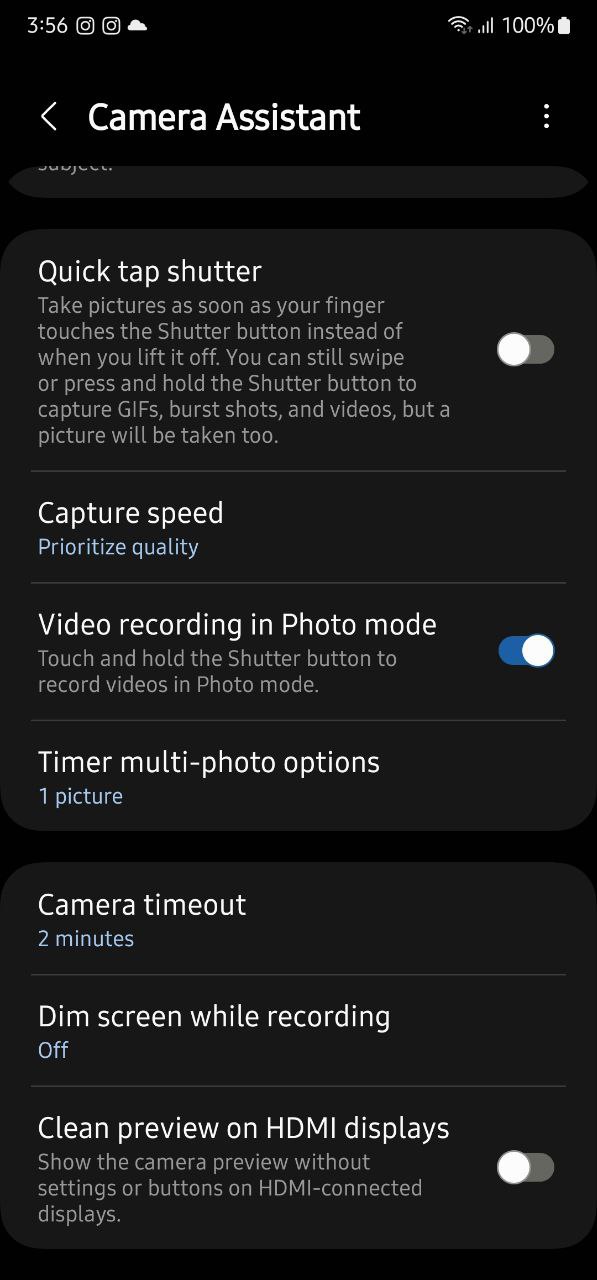
Quick tap stutter:
The quick tap shutter is a new addition to Camera Assistant that improved the users’ shooting experience. It lets you set a photo to be taken immediately the moment your finger touches the capture button, rather than the moment it realizes.
Capture speed:
This feature allows you to set the priority between image quality and capture speed. If you want to shoot quickly for capturing the moment rather than the quality you can try the “Prioritize speed” option.
Meanwhile, you can choose “Prioritize quality” for the best pictures or “Balance speed and quality” for faster capturing without sacrificing too much quality.

Video recording in Photo mode:
The name itself tells its use, it lets you record videos in photo mode. All you need is to touch and hold the shutter button to record videos after you have enabled the toggle.
Timer multi-photo options:
By default, the camera of your Galaxy phone takes one photo with the timer mode. But with this feature enables, you can shoot continuously at regular shooting intervals without having to press the shooting button again.
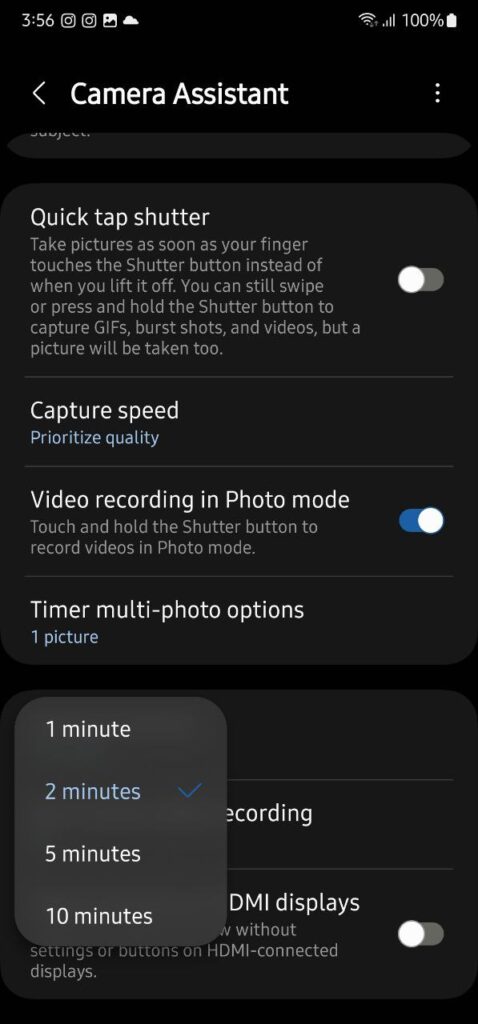
Camera timeout:
You can choose the camera timeout time here. Once you set it, your phone will automatically close the camera app. You can choose between – 1, 2,5, or 10 minutes options.
Dim screen while recording:
This feature will save the battery of your phone by setting the screen brightness to low when recording video for a long time.
Clean previous on HDMI displays:
Once turned on, this feature will show you the camera preview without settings or buttons on HDMI-connected displays.
Introduced with the Galaxy S23 series, Samsung’s latest custom software – One UI 5.1 has reached millions of Galaxy users through OTA updates. It brings a lot of new features and improvements, meanwhile, this story talks about the Samsung Lock Screen features that you can use on your One UI 5.1 smartphone.
Samsung One UI is known for customization and it has some amazing Lock Screen customization options which let you do much more than just unlock your phone. You can add different app shortcuts, contact information, and widgets, as well as customize the clock, notifications, and much more.
If you are among the people who like to personalize their phones with different elements, you should definitely check out these eight smart One UI 5.1 Lock Screen features.
One UI 5.1 Lock Screen features
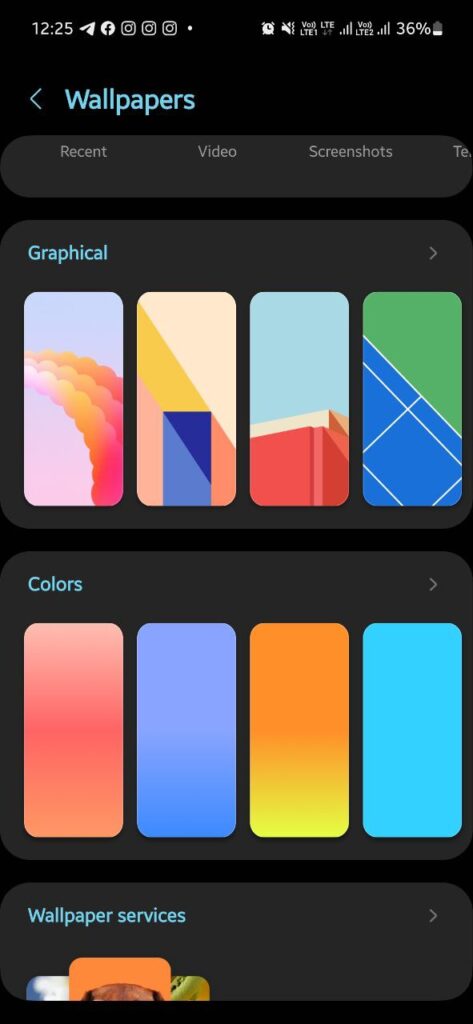
Change Lock Screen Wallpaper:
Tap and hold your phone’s lock screen to open a live preview of your lock screen. Tap the “Wallpaper” button in the top-left corner to change your lock screen wallpaper.
You can choose a wallpaper from one of the default categories on the following page, or select an image from your Gallery. Once finalized, tap the “Done” option to apply the changes.
Add filter to Lock Screen Wallpaper:
Samsung offers you a variety of filters that you can apply on the lock screen wallpaper. At the bottom of the Lock Screen preview, there’s a “Filter” option. Tap on it and you will see some great filters.

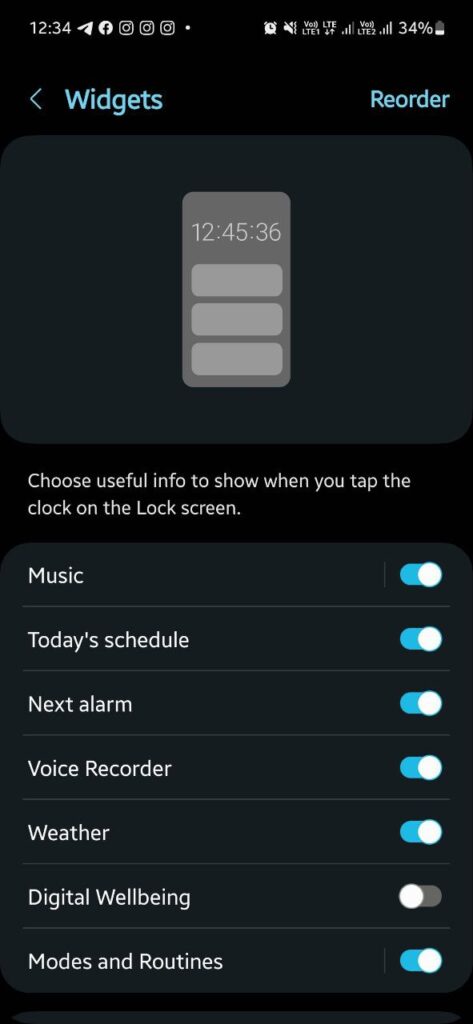
Lock Screen Widgets:
Head over to the “Lock Screen settings” on your Galaxy phone and tap on the “Widgets” option. Now simply, turn the “toggle on” for the widget you want to see on the lock screen.
You can also reorder the widgets by tapping the “Reorder” option in the top right corner. Simply, tap and hold the widget you want to shift and arrange them according to your preferences.
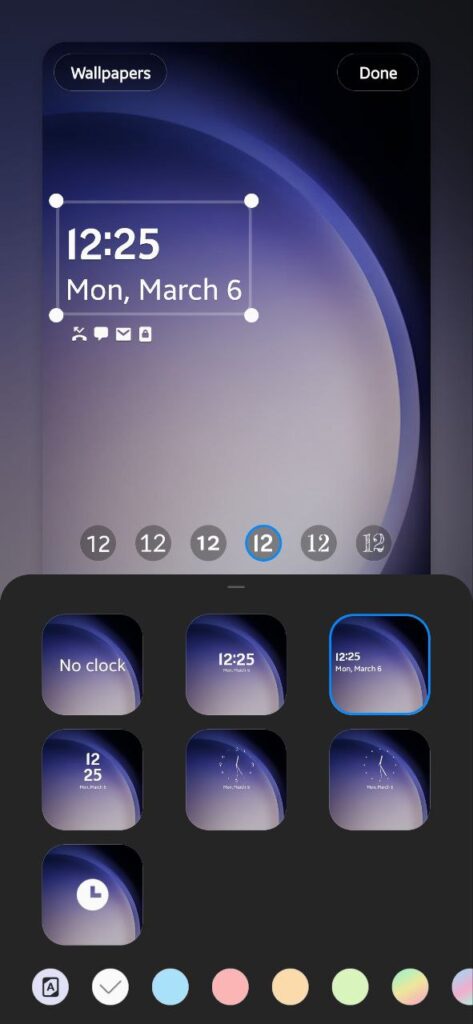
Personalize Lock Screen Clock Widget:
Tap the Clock Widget on the live preview of your lock screen to unlock customization options. Select one of the five analog and digital clock styles from the pop-up window.
If you choose a digital clock, you can change its font by tapping the six available options at the top of the pop-up window. You can also change the clock color from the bottom bar or let One UI automatically adjust the color based on your wallpaper by choosing the first option.
If you want, you can resize the clock widget by dragging one of the four corners. Once you are satisfied with the result, tap on “Done” to apply changes in real.
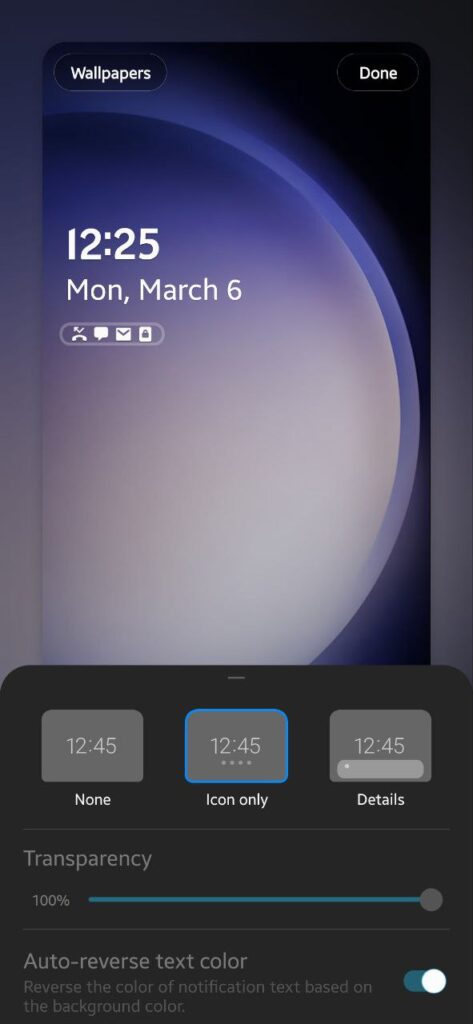
Customize Lock Screen Notifications:
On the live preview of your phone’s lock screen, tap on the Notification icons, and the customization options will appear. Select one of the three notification styles from the following pop-up: None, Icon only, or Details.
If you choose Details, the following customization options will appear:
- “Adjust the transparency” of the notification using the slider in the pop-up window.
- Enable the “Auto-reverse text color” option if you want One UI to automatically adjust the notification text color based on the wallpaper for improved visibility.
- Finally, tap “Done to apply your customizations to the lock screen.
Add Lock Screen Contact Information:
Again, open the live preview of your phone’s lock screen through Settings. Tap on the “Contact Infomation” option at the bottom of the screen. Enter the contact information you wish to display on the lock screen in the following pop-up.
You can add a phone number, email address, or others as well as add emojis to the text. For example, I wrote “SammyFans” with two Blue hearts. Once done, tap “Done”.

Lock Screen Shortcuts:
The Phone and Camera app icons that appear on the bottom corners of the lock screen are shortcuts. You can them if as per your preferences. To do so, open the Lock Screen settings and tap on any of the shortcuts.
You can select the app installed on your device as well as go for useful functions like Flashlight, Bixby wakeup, Do not disturb, and more. Do the same with another shortcut. Tap the “Done” option when completed.

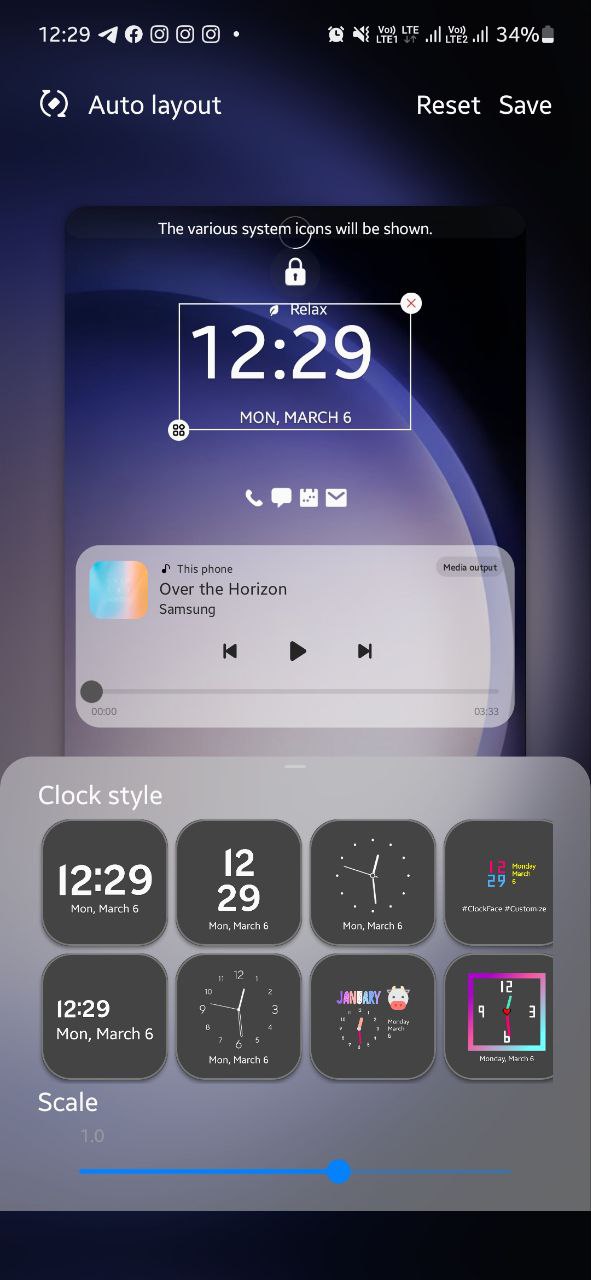
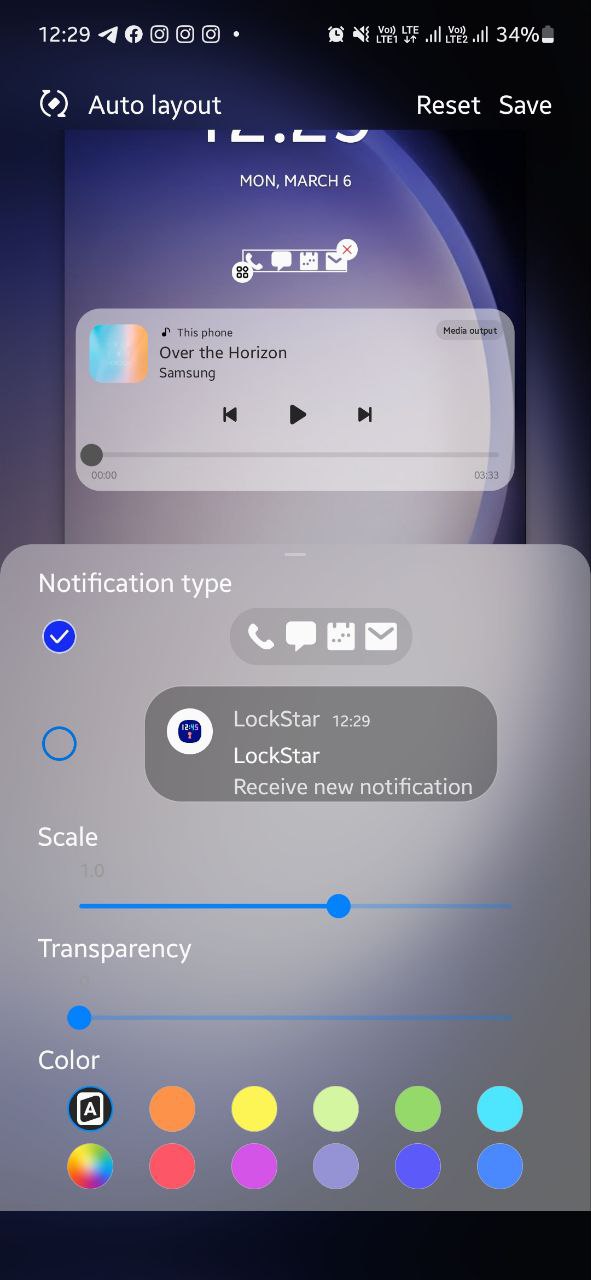
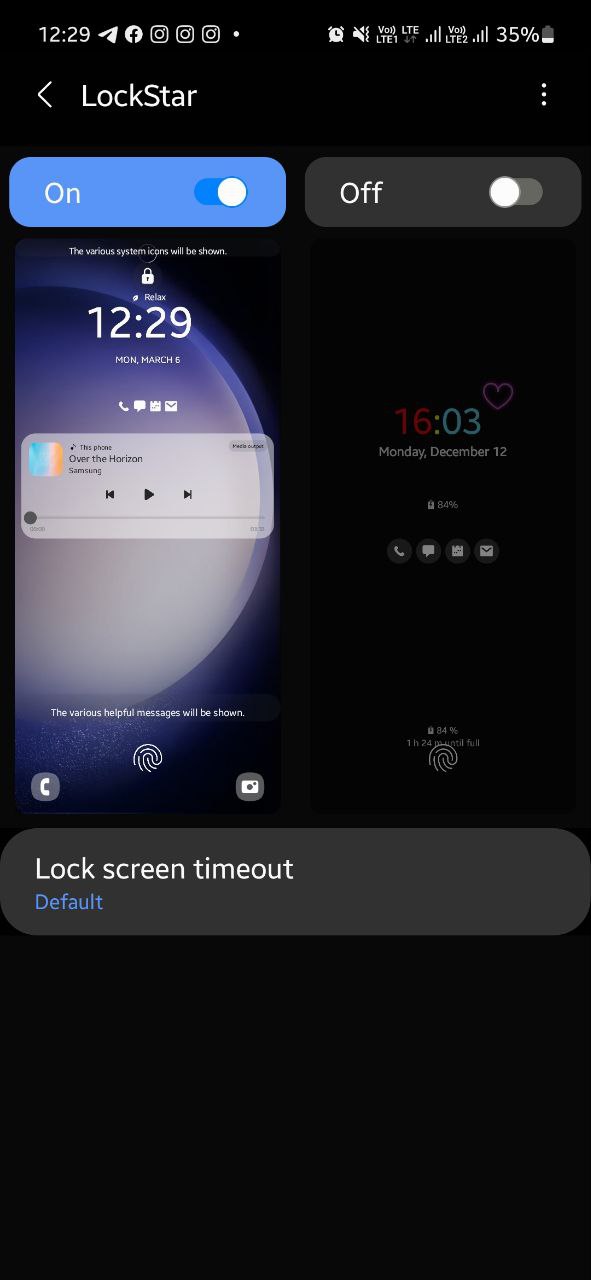
Use Good Lock’s LockStar module:
If you are not satisfied with the above-mentioned stock lock screen customization options, install the Good Lock’s LockStar module for further personalization capabilities.
Open the module and enable lock screen customization on the following screen by tapping on the toggle in the top-left. Now tap on the lock screen to open a live preview with the customization features.

Here, you can select the element you want to customize and drag it anywhere on the screen to change its location. If you want, you can remove unwanted elements by tapping the “X” button in the top-right corner of the selection.
However, if you accidentally remove an element, tap the empty area in its previous position to open a pop-up menu including elements you can add to the area.


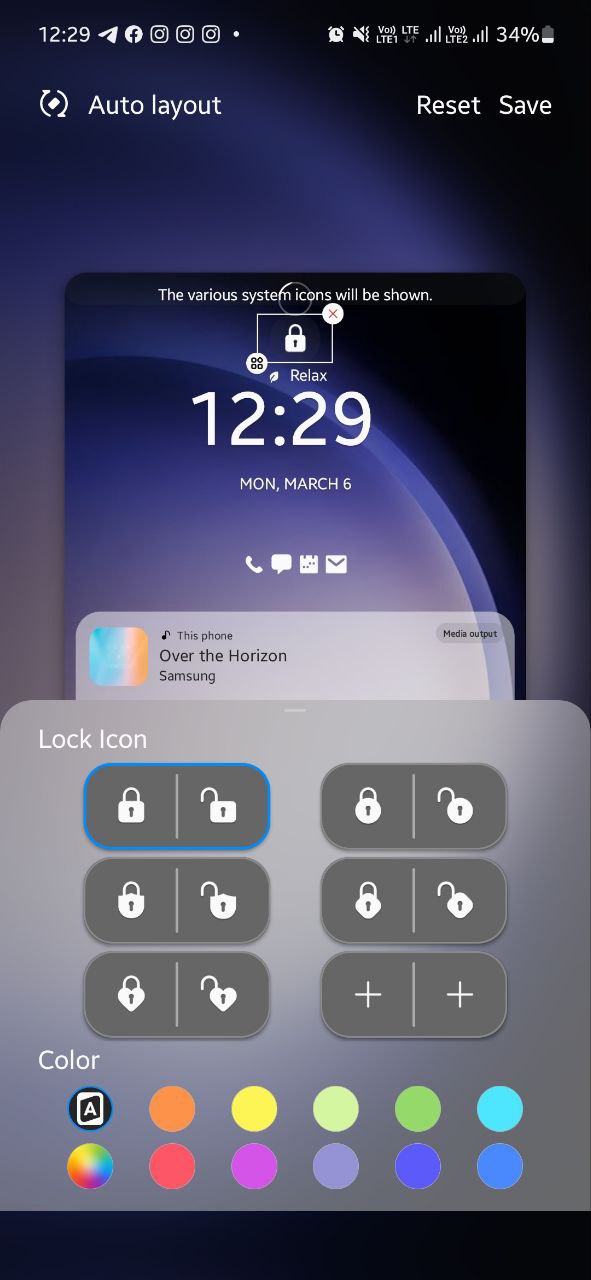
Change the appearance of the lock icon at the top of the screen, the clock widget, the shortcuts, or the toast by selecting the element and then tapping the icon with four squares in the bottom-left corner of the selection.
There are more Clock faces, the ability to add up to 6 app shortcuts, the ability to add Stickers, and more. After you complete the customization, select the “Save” button in the top-right corner to apply the changes.